Replacing your car’s interior carpet can significantly enhance its appearance and overall value. Whether you’re dealing with unsightly stains, wear and tear, or simply seeking a fresh new look, installing new carpet is a rewarding DIY project. This guide provides a step-by-step process, helpful tips, and answers to frequently asked questions to help you achieve a professional-looking result. By following these instructions, you can transform your vehicle’s interior and enjoy a more comfortable and visually appealing driving experience.
Preparing for the Installation
Before you begin, proper preparation is key to a successful carpet installation. This involves gathering the necessary tools and materials and thoroughly cleaning the vehicle’s interior.
Gathering Your Tools and Materials
Ensure you have everything you need before you start. This will save you time and frustration during the installation process.
- New car carpet kit (specific to your vehicle make and model)
- Utility knife or sharp scissors
- Screwdrivers (various sizes)
- Socket set
- Pliers
- Vacuum cleaner
- Carpet adhesive spray
- Floor scraper
- Measuring tape
- Gloves
- Safety glasses
Cleaning the Vehicle Interior
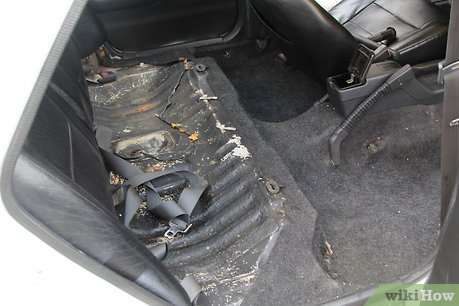
A clean surface is crucial for proper carpet adhesion. Remove all debris and ensure the floor is free of dirt and grime.
- Remove all seats, center console, and trim pieces. Take pictures before you remove anything; this will help you remember how to reassemble it.
- Vacuum the entire interior thoroughly, paying attention to crevices and hard-to-reach areas.
- Scrape away any old adhesive or debris from the floor pan.
- Wipe down the floor pan with a damp cloth to remove any remaining dirt.
- Allow the floor pan to dry completely before proceeding.
Installing the New Carpet
With the preparation complete, you can now proceed to install the new carpet. This process requires patience and attention to detail.
Cutting and Fitting the Carpet
Precise cutting and fitting are essential for a professional finish. Take your time and double-check your measurements.
Fact: Many carpet kits come slightly oversized to allow for adjustments and a custom fit.
Securing the Carpet
Properly securing the carpet prevents shifting and ensures a long-lasting installation. Use carpet adhesive spray sparingly and evenly.
| Step | Description |
|---|---|
| 1 | Apply carpet adhesive spray to the floor pan in small sections. |
| 2 | Carefully position the carpet section and press it firmly into place. |
| 3 | Repeat steps 1 and 2 for each section of the carpet. |
| 4 | Use a roller or your hands to ensure the carpet is fully adhered to the floor pan. |
Frequently Asked Questions (FAQ)
Here are some common questions about car interior carpet installation.
- How long does it take to install car carpet? The installation time varies depending on your experience and the complexity of the vehicle, but it generally takes between 4 to 8 hours.
- What if my carpet kit doesn’t fit perfectly? Most kits are slightly oversized. Use a utility knife to trim the carpet for a perfect fit.
- How do I prevent the carpet from wrinkling? Ensure the floor pan is clean and smooth, and use carpet adhesive spray evenly.
- Where can I buy a car carpet kit? You can find car carpet kits online, at auto parts stores, and from specialized automotive upholstery shops.
Installing new carpet in your car’s interior is a fantastic way to refresh its look and feel. By following these steps and taking your time, you can achieve a professional-quality result that will enhance your driving experience. Remember to prioritize safety by wearing gloves and safety glasses, and always double-check your measurements before cutting. With a little patience and attention to detail, you can transform your car’s interior and enjoy a more comfortable and visually appealing ride for years to come. The satisfaction of a job well done will be evident every time you step into your vehicle. Good luck with your carpet installation!
Finishing Touches and Reassembly
Is the carpet securely in place, adhering smoothly to all contours? Have you allowed ample drying time for the adhesive, as specified by the manufacturer? It’s time to put everything back together!
Reinstalling Seats and Trim
Do you remember where everything went? Did you take pictures as suggested earlier? It’s time to put those photos to good use!
- Are you carefully reinstalling the seats, ensuring all bolts are tightened to the correct torque specifications? Are you consulting your vehicle’s repair manual for the correct torque values?
- Are you reattaching the center console, making sure all wiring harnesses are properly connected? Is everything clicking securely into place?
- Are you replacing any trim pieces that were removed, ensuring they are properly aligned and fastened? Are any clips or fasteners broken and in need of replacement before proceeding?
Final Inspection and Cleaning
Now that everything is back together, are you giving the interior a final inspection? Are there any areas that need touching up, such as loose edges or exposed adhesive?
Fact: A final vacuum can remove any remaining dust or debris from the installation process.
Advanced Tips and Considerations
Want to take your carpet installation to the next level? Are there any additional considerations for specific vehicle types or custom installations?
- Are you considering adding sound deadening material under the carpet for improved cabin noise reduction? Is this a worthwhile investment for your driving environment?
- Are you aware of any specific challenges associated with installing carpet in classic cars or vehicles with complex floor pan designs? Do you need specialized tools or techniques?
- Are you considering a custom carpet installation with unique colors or materials? Have you researched reputable automotive upholstery shops that can provide this service?
Troubleshooting Common Issues
Encountering problems during the installation? Are you prepared to troubleshoot common issues that may arise?
| Issue | Possible Solution |
|---|---|
| Carpet not adhering properly | Did you clean the floor pan thoroughly? Did you apply enough adhesive? Is the adhesive the correct type for automotive carpet? |
| Carpet bunching or wrinkling | Did you stretch the carpet properly during installation? Is the floor pan uneven? Do you need to use a heat gun to relax the carpet fibers? |
| Trim pieces not fitting correctly | Are you using the correct trim pieces for your vehicle model? Are any of the mounting points damaged? Do you need to adjust the carpet placement to allow for proper trim fitment? |
Have you successfully reinstalled your car’s interior, enjoying the fresh look and feel? Does the new carpet enhance the overall driving experience? Did you learn valuable skills and gain confidence in your DIY abilities? Hopefully, this guide has been helpful, providing you with the knowledge and resources to tackle this project with success. Remember, patience and attention to detail are key! Now, are you ready to hit the road in your newly refreshed vehicle? Are you proud of the work you’ve done? Enjoy the ride!
